

The goal of digital printing using a Color Managed System is to get accurate screen to print matching. This requires an accurately calibrated and profiled monitor and accurate printer profiles so that you can Soft Proof your images.
Soft Proofing allows you to see a simulation on screen, using the printer profiles we provide, of what your image will look like when it is printed on the paper you have chosen, and then if need be to fine tune any edits necessary for screen to print matching.
Soft Proofing your images can be done in color managed software like Adobe Photoshop CC, or Adobe Lightroom Classic CC, but soft proofing is done very differently in two these applications using Printer Profiles.
YOU MUST PROPERLY CALIBRATE YOUR MONITOR BEFORE EDITING AND VIEWING IMAGES FOR SUBMISSION TO THURSTON PRINT LAB

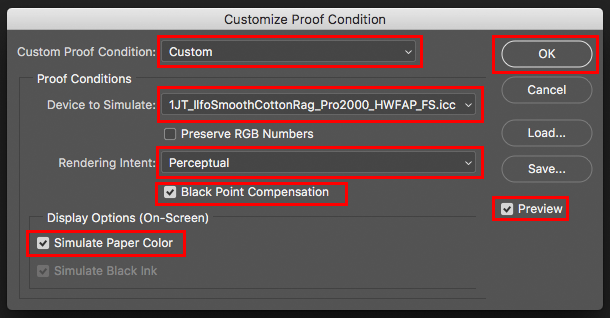
Custom Proof conditions Dialogue Box
The conditions under which you Soft Proof your image are set in the Custom Proof Condition dialogue box by going to the View > Proof Setup > Custom menu and making the following settings:
- Customize Proof Condition:
These Settings can be saved, named, and loaded for each Paper Profile used - Device to Simulate:
Choose the Profile for the Paper you want to Soft Proof - Rendering Intent – See Discussion on Rendering Intent
- Relative Colorimetric OR
- Perceptual
- Black Point Compensation – Checked
- Preview – Checked
- Simulate Paper Color – Checked
Soft Proof settings can be toggled On and Off with View > View Colors menu choices,
or the keyboard shortcut Command-Y (Mac),
or Ctrl-Y (Windows).
Colors that are out of the Profile’s Gamut can be viewed with View > Gamut Warning, or the keyboard shortcut Command-Shift-Y (Mac),
or Ctrl-Shift-Y (Windows).
Rendering INtent
Your choice of a Rendering Intent tells a Color Managed App how to handle color conversions between different color spaces. This is particularly important when converting colors from a wider-gamut color space (such as an editing space like ProPhoto) to a smaller-gamut color space (like a printer profile’s color space).
You have two choices; Perceptual, and Relative Colorimetric. What’s the difference between these two?
Perceptual
A Perceptual rendering intent preserves the overall color appearance by changing all colors in the source space to fit within the destination space. The perceptual rendering intent is favored for images that contain many out-of-gamut colors.
Relative Colorimetric
A Relative Colorimetric rendering intent reproduces in-gamut colors exactly and clips, or throws out, out-of-gamut colors to the nearest reproducible color. The Relative Colorimetric rendering intent is a good choice for images where more of the colors are in-gamut than out-of-gamut.
Which Rendering Intent to use?
You should toggle between both rendering intents in each image you Soft Proof and or Print to see what subtle changes it makes to the Image or Print.
As a general rule the Canon Pro-2000 Printer with its Wide Color Gamut renders prints very accurately using the Perceptual Rending Intent with our Custom Printer Profiles.


Lightroom Color Working Space
Lightroom does not have a Color Working Space settings dialog box.
By default Lightroom converts all images Imported using a variant of Adobe’s Wide Color Gamut, the Adobe ProPhoto Color Working Space for all image editing, and it is the largest of all Color Working Spaces.
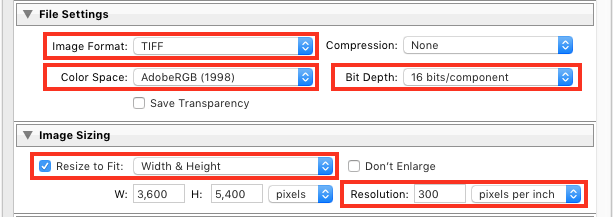
What is important to note is that even though Lightroom Classic CC does not allow you to choose how you manage “Color Traffic”, it does let you control “Outgoing Traffic” with the File > Export > Export To…File dialogue box where you can specify the Image Format, Color Space, Bit Depth, Image Size, and Resolution.
Lightroom Color Management
In order for you to Soft Proof your images in Lightroom using Printer Profiles you need to setup the Color Management within Lightroom by:
Selecting the Image you want to Soft Proof in Lightroom from your Library by Selecting Library from the Menu Bar. You can also go directly to your Image Library by pressing the G key, (G is for Image Library Grid ).

Then Go to the Print Module by clicking on Print in the Menu Bar, or you can use the keyboard shortcut of Command Key+Option Key+ 6 on Mac,
or Control +Alt+6 on Windows, in a default installation of Lightroom CC..

Then Scroll down to the bottom of the Print Panes on the right side of the screen until you see a separate Pane titled: Color Management.
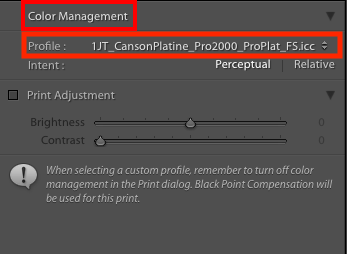
The Profile Drop Down Menu may or may not show any installed Profiles. Make sure after installing our Profiles, that you have quit any Adobe Products and restarted them in order for the Profiles to show up in their respective App Menus.
If all the Custom Profiles you just added aren’t shown in the Profiles Drop Down Menu, click on the Menu and select “Other…”
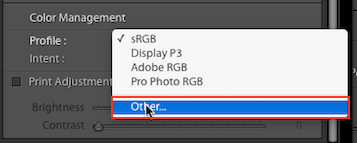
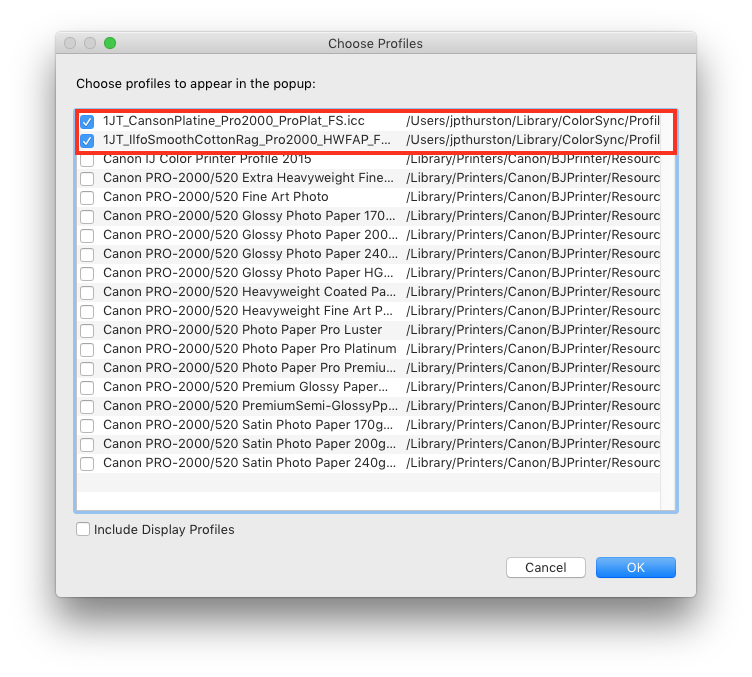
By selecting Other, all the Profiles installed in the appropriate Profiles Folder on your Computer OS will be in this list, and check the ones you want to use to Soft Proof with.
In this example the Profiles for our Fine Art Papers: Canson Platine Fiber Rag and Ilford Cotton Smooth Rag have been selected and will now appear in the Profile Drop Down.
Lightroom Soft Proofing
The following video from Canson ® Infinity E-Academy gives a basic introduction to Soft Proofing in Lightroom.
In order to View the Soft Proof of your selected Image on Screen you have to go to the Develop Module with an Image files selected.
Press the “D” key, or select Develop from the Menu Bar.
Go to the View Menu > Soft Proofing > Show Proof, or the “S” Key for Show Proof and the Image will be “Printed to Screen” through the Profile you choose.
To toggle displaying the out of Gamut Colors, go to View >Soft Proofing > Destination Gamut Warning, or Shift-S, or click on the Paper Sheet icon in the upper right corner of the Image Histogram.

Choose either Relative or Perceptual Rendering Intent under the Profile Name, or from the View > Soft Proofing >Rendering Intent menus, and check the Simulate Paper & Ink check box under the Rendering Intent, or use the View > Soft Proofing >Simulate Paper & Ink menus for the most accurate Soft Proof of your image.
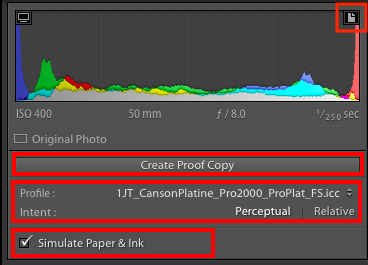
Similar to Lightroom’s Virtual Copy you can Create Proof Copy of your Image with the name of the Profile added to it’s filename.
With the Soft Proofing Edits applied you can compare it Side by Side with the original image by going to View > Compare mode.
Rendering INtent
Your choice of a Rendering Intent tells a Color Managed App how to handle color conversions between different color spaces. This is particularly important when converting colors from a wider-gamut color space (such as an editing space like ProPhoto) to a smaller-gamut color space (like a printer profile’s color space).
You have two choices; Perceptual, and Relative Colorimetric. What’s the difference between these two?
Perceptual
A Perceptual rendering intent preserves the overall color appearance by changing all colors in the source space to fit within the destination space. The perceptual rendering intent is favored for images that contain many out-of-gamut colors.
Relative Colorimetric
A Relative Colorimetric rendering intent maps the white of the source space to the white of the output. It reproduces in-gamut colors exactly and clips, or throws out, out-of-gamut colors to the nearest reproducible color. The Relative Colorimetric rendering intent is a good choice for images where more of the colors are in-gamut than out-of-gamut.
Which Rendering Intent to use?
You should toggle between both rendering intents in each image you Soft Proof and or Print to see what subtle changes it makes to the Image or Print, and train your eye to choose which looks best to you.
As a general rule the Canon Pro-2000 Printer with its Wide Color Gamut renders prints very accurately using the Perceptual Rending Intent with our Custom Printer Profiles.
